This recipe is from the Penzeys Fall 2011 catalog. I thought I'd give it a try since I've been wanting to make chocolate chip cookie bars for awhile now. So far, they smell good in the oven. I hope everyone at work enjoys them tonight!
Oatmeal Chip Bars
Ingredients:
1 C room temp butter
1 1/4 C brown sugar
3/4 C white sugar
2 eggs
1 t vanilla
2 C flour
2 t baking powder
1/2 t salt
2 C oats (regular or quick-cooking)
3/4 C chocolate chips
3/4 C butterscotch chips
Directions:
Preheat oven to 375.
In a mixing bowl, cream butter, sugars, eggs and vanilla.
In a separate bowl, combine flour, baking powder and salt. Gradually add to creamed mixture.
Mix in oats and chips last.
Spread in a 9x13 pyrex or similar dish. Bake for 25ish minutes.**
**Always set your timer for less time than a recipe says. You can always add more time!
Thursday, September 22, 2011
Wednesday, August 17, 2011
Pumpkin Muffins!
I brought these to work the other day and everyone wanted the recipe...so here it is! This recipe makes about 12 muffins so I usually double it.
Pumpkin Muffins
Ingredients:
Wet:
1/2 C unsalted butter, melted and cooled
3/4 C packed brown sugar (I know it's not really wet, but it goes in this group)
3/4 C canned pumpkin
1/4 C well-shaken buttermilk
2 large eggs
1 t vanilla
Dry:
2 C flour
2 t baking powder
1/4 t baking soda
1 t cinnamon
3/4 t ground ginger
1/8 t ground allspice
1/8 t ground cloves
1/2 t salt
Optional:
1/3 C dried cranberries (I added more as I went until I like the amount that was in the batter)
You could also use raisins and pepitas (pumpkin seeds) if you'd like
Directions:
--Preheat oven to 400 deg.
--Throw all of the dry ingredients together in a bowl.
--Mix wet ingredients together in the mixer.
--Slowly add the dry ingredients to the wet ingredients and then add cranberries.
--Put batter in muffin tins (with or without paper). These muffins do not rise a lot so fill about 2/3 full.
--Bake about 15 min. The time really depends on your oven so start with a low number and add time as needed. Muffins are done when you can poke a skewer in a muffin and it comes out clean.
--Cool on a cooling rack.
Wednesday, July 6, 2011
Pacifier Clip Tutorial
Yes, I know, just like all of my other posts, it's been awhile. But before I head to the airport to go home, I thought I'd post something. So for all of you making stuff for babies, here's tutorial for a pacifier clip or toy clip. I made 2 because they match the hooter hider I made. Also, Happy Birthday to Ryan James, who was born today! And congratulations to Katie, his mom!
Supplies:
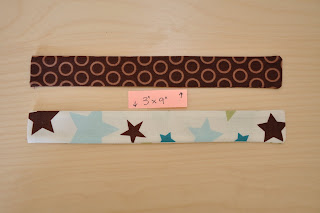
1 Piece of fabric 3" x 9"
1 Mitten clip
7" of 5/8" Ribbon (Grosgrain works best)
Coordinating thread
Instructions:


Supplies:
1 Piece of fabric 3" x 9"
1 Mitten clip
7" of 5/8" Ribbon (Grosgrain works best)
Coordinating thread
Instructions:
Cut your fabric.

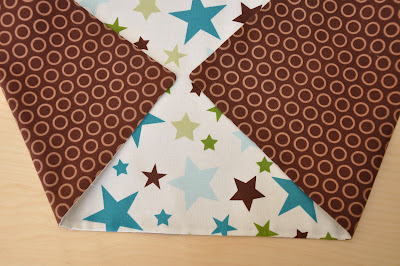
Turn right sides together and pin. Fold down one end about 1/4". This makes it look nice after you turn it.

Sew three sides. Leave the end you folded over open. Trim the corners.

Make sure you catch part of the fold so it doesn't come undone when you turn it.

Turn the tubes inside out and iron flat.

Take your ribbon and fold in half. Sew into the opening. Sew a tiny seam around the entire thing. I add a small stitch across the top right next to the ribbon just for security purposes (not shown). The grosgrain ribbon works best for putting through pacifiers with tiny holes (soothies) but if you're using a pacifier with a loop, it doesn't matter what kind of ribbon you use.

Take your mitten clips and sew them on. Make sure when you fold the end over the bottom of the clips are facing the part you're folding over. I sew across and then up the 2 sides, following the other seams.

The top side.

Clip it on! You can also put this on toys or whatever so it doesn't fall on the ground. You could also put a clip on each end so you can attach blankets and stuff to the stroller/carseat/kid...whatever you like!

If you put clips on both ends you can attach a blanket or burp cloth to the carseat or a shirt. This was very useful when I was walking through the airport w/ a burp cloth on my shoulder. It inevitably slipped off my shoulder but didn't fall on the floor b/c of my double clip!
Tuesday, April 12, 2011
Streusel Coffee Cake
I made this delicious coffee cake today. I've been thinking about making if for a couple weeks and today happened to be the day. I had my doubts when I was making the batter because it was sooo thick and there wasn't very much...but it is fab. And puffs up like a gem. The recipe is from A Bountiful Kitchen. The recipe can be found here but I'm putting it on here because I actually remembered to take pictures and darn it, I'm going to use them!
Streusel Coffee Cake


Streusel Coffee Cake
1 1/2 cups flour
3/4 cup sugar
2 t baking powder
1/4 t salt
1 egg, beaten
1/2 cup milk
1/4 cup oil (vegetable)
Streusel topping:
4 T brown sugar
2 T flour
1 t cinnamon
4 T butter
1 cup chopped nuts (optional)
if not using nuts, add 1/2 cup flour (*I used a total of 4 T of flour for the topping and no nuts. 1/2 C just seemed like so much)
Preheat oven to 350 degrees.
Mix the first 4 cake ingredients in a bowl. Make a well in the center, and add the wet ingredients. Mix just until all ingredients are incorporated.

Pour into a greased 8 or 9 inch cake pan (round or square).

Place brown sugar, flour and cinnamon for streusel into a small bowl. Cut butter into dry ingredients. Add chopped nuts, or more flour if omitting nuts. Crumble topping over batter .

Bake at 350 for about 30-40 minutes, or until toothpick inserted in center comes out clean. Serve warm.

Fresh out of the oven.

After cooling for a bit.

The final product. YUM!

Next time I make this, I would swirl some of the streusel into the batter and then cover the top. The cake is really good but I think having some cinnamon in the middle would be nice.
Tuesday, March 22, 2011
Caesar Dressing
This is my absolute favorite recipe for Caesar dressing. It's also my only recipe for Caesar dressing but that doesn't matter. It comes from Cooks Illustrated magazine which is a fantastic place not only for recipes, but also an explanation for why they do the things they do, the best way to store things and sometimes product reviews. This particular recipe came from the light and healthy edition. This is my version...no anchovies for me! It also recommends using a blender to mix it all together. I use a fork. Works great, less mess.
Caesar Dressing
1/2 C low-fat buttermilk
3 T light mayonnaise
2 T fresh lemon juice
2 T water
1.5 t yellow mustard
1/2 t Dijon mustard
1 t Worcestershire sauce
1 garlic clove, squished in a garlic squisher
1/2 t pepper
1/4 t salt
2 T EVOO
1 oz freshly grated Parmesan cheese (about 1/2 cup)
Mix everything except the Parmesan cheese together in a bowl. Grate the Parmesan cheese with a microplane grater and weigh with your kitchen scale (yes, of course I have one). Mix it all up and eat it because it's sooo good!
For those of you who don't know what a microplane grater is...
 there ya go. It's a grater with little tiny blades and it will severely damage the tips of your fingers. So be careful! It's also good for zesting, grinding up ginger, saying you have a microplane grater, etc....I do actually use mine all the time.
Also, if you don't have a garlic squisher (AKA a garlic press), get one of those too. I mean really, who wants to mince garlic?! NO ONE! Here's a little garlic tip...the best way to peel garlic = silicone pot holder. Yes, you could buy one of these...
 but it's really only good for one thing. Instead get one of these...

**The microplane grater picture came from a blog which I stumbled upon called A Bountiful Kitchen. It appears to have all kinds of recipes and is very well organized. Worth takin' a look at!
Caesar Dressing
1/2 C low-fat buttermilk
3 T light mayonnaise
2 T fresh lemon juice
2 T water
1.5 t yellow mustard
1/2 t Dijon mustard
1 t Worcestershire sauce
1 garlic clove, squished in a garlic squisher
1/2 t pepper
1/4 t salt
2 T EVOO
1 oz freshly grated Parmesan cheese (about 1/2 cup)
Mix everything except the Parmesan cheese together in a bowl. Grate the Parmesan cheese with a microplane grater and weigh with your kitchen scale (yes, of course I have one). Mix it all up and eat it because it's sooo good!
For those of you who don't know what a microplane grater is...

Also, if you don't have a garlic squisher (AKA a garlic press), get one of those too. I mean really, who wants to mince garlic?! NO ONE! Here's a little garlic tip...the best way to peel garlic = silicone pot holder. Yes, you could buy one of these...


They're good for peeling garlic, keeping your hands from being burned, holding your cutting board in place, getting a lid off of a jar...so many uses! They have really cute ones at Sur La Table that come in the shapes of animals. And at Christmas they have gingerbread men, snowmen, penguins...things like that. Way more fun/useful than a silicone tube.
**The microplane grater picture came from a blog which I stumbled upon called A Bountiful Kitchen. It appears to have all kinds of recipes and is very well organized. Worth takin' a look at!
Tuesday, March 15, 2011
1/2 Apron Tutorial
I made this apron for a bridal shower over the weekend and it turned out pretty cute. I love the fabric and wish I would have bought more. It's Amy Butler who pretty much always has awesome fabric. I adjusted the tutorial from Stop Staring and Start Sewing. My lovely model was rushing to go to the shower but took 4 seconds to take a pic for me! Thanks Cakes!
 Supplies:
1 Fat Quarter of Fabric
1/2 yard of coordinating fabric
 From your fat quarter cute a little bit off to make it 16" x 20" (you can use your whole fat quarter. I adjusted mine for the little person I was making this for). Also cut 2 pieces of coordinating fabric 5" x 21" and 1 piece 5" x 22" (*). Again, you can adjust the 5" if you want a larger tie and increase the length if you want it longer.
 Sew the band together, end to end, right sides together so you make a really long strip. Make sure you put the 5" x 22" piece in the middle. Press seams open.

 Fold and press 3 sides in, leaving one long side undone. I folded twice to create a nice edge. Sew in place.


 Next, fold down the top 1/4" but only the part that is above the main piece. The straps do not need to be folded. Iron in place.
 With right sides together, fold the straps on top of each other to and sew to create a tube. (check out the pic below for how to do the ends) DO NOT sew the part that you just folded down. See in the picture? The part above the main fabric is open. Don't sew it!

 When you get to the end, sew it diagonally. Then trim the excess.

 Turn the tubes right side in. Fold down the top of the band and pin in place. Top stitch around the entire band and you're done!
*My numbers for this are slightly off because I was in a hurry and didn't trim the selvage off. So, adjust accordingly. The trouble comes when the sides of the main fabric piece are turned in to create an edge. It depends on how big you make your seam allowance. But if you're not in a hurry, think about it a little and it'll be right. I think i also would have made the straps a little longer for tying in front. It's probably fine if you're tying in back but I didn't try it.

1 Fat Quarter of Fabric
1/2 yard of coordinating fabric


With right sides together, sew the 2 pieces together and press the seam towards the band. I found out later that you should press towards the band, so the picture it wrong but I wanted to show the backside.


*My numbers for this are slightly off because I was in a hurry and didn't trim the selvage off. So, adjust accordingly. The trouble comes when the sides of the main fabric piece are turned in to create an edge. It depends on how big you make your seam allowance. But if you're not in a hurry, think about it a little and it'll be right. I think i also would have made the straps a little longer for tying in front. It's probably fine if you're tying in back but I didn't try it.
Tuesday, February 22, 2011
Chopstick Carrier Tutorial
Did you know that in China alone they use about 45 billion pairs of chopsticks a year? I know how everyone always brings their own chopsticks to Asian restaurants and how they're always thinking, "How on Earth do I carry my chopsticks!?" Well! I have an answer for you! The Chopstick Carrier! It's really easy to make. And I'm not saying I carry my own chopsticks around with me wherever I go (but I probably should and so should you) but now there's no excuse...except that I made this for my friend in Japan who really does carry her chopsticks around with her everywhere so I'd actually have to make myself one of these bad boys. Anywho, here it is.

Ingredients:
12" square of fabric
12" square of thin interfacing
22" ribbon
pair of chopsticks (or just 1)
fray check
Directions:
--Iron the interfacing onto the WRONG side of your fabric.
 --Fold on the diagonal and pin. Fold the ribbon in half and place the fold on the outside of the carrier and the rest of the ribbon inside. Mark an opening as a reminder so you can flip this baby right side out.

 --Clip the corners to reduce bulk after you flip it.

 I forgot to take pictures for the rest (sorry).
--Flip the carrier right side out. Iron flat. Sew a 1/8" seam around the top corner. Do not sew a seam around the bottom edge.
--Fold in the corners according to the length of your chopstick(s). I folded my corners in 2.5".
--Sew a 1/8" seam on the bottom to tack the corners down.
--Use fray check to seal the ends of your ribbon.
 Make yours today so you can bring your own chopsticks to your favorite Asian restaurant! And if you don't know how to use chopsticks, learn today. It's a very important noodle-eating skill. I mean really, how do you get the 1 cm noodle bits out of your bowl with a fork!?

12" square of fabric
12" square of thin interfacing
22" ribbon
pair of chopsticks (or just 1)
fray check
Directions:
--Iron the interfacing onto the WRONG side of your fabric.


--Flip the carrier right side out. Iron flat. Sew a 1/8" seam around the top corner. Do not sew a seam around the bottom edge.
--Fold in the corners according to the length of your chopstick(s). I folded my corners in 2.5".
--Sew a 1/8" seam on the bottom to tack the corners down.
--Use fray check to seal the ends of your ribbon.

Sunday, February 20, 2011
Chocolate Zucchini Cake
I don't have a craft update for this week (yet) so I thought I'd put in another delicious Mom recipe. Chocolate zucchini cake is a mix between bread and cake. The consistency is cake-like but the taste is like chocolate zucchini bread. Very tasty, recommended for all ages. Perhaps when I make some in the future I'll post a picture of it also. I would also like to wish my oldest (but not old) sister a happy birthday! I miss you Kimb!
Chocolate Zucchini Cake
½ C Butter
½ C Vegetable Oil
1 ¾ C Sugar
2 Eggs
1 T Vanilla
2 C Grated Zucchini
½ C Buttermilk or Sour Cream
¼ t Salt
2 ½ C Flour
1 t Baking Soda
4 T Cocoa Powder
½ t Cinnamon
¼ t Cloves
2 C Chocolate Chips
--Cream together butter, oil and sugar.
--Add eggs and vanilla.
--Combine dry ingredients and add to creamed mixture alternately with buttermilk/sour cream.
--Add zucchini.
--Add ½ of the chocolate chips.
--Pour into greased and floured 9x13 pan. Sprinkle with chocolate chips.
--Bake at 325 for 35-40 min. Cupcakes for approx 25 min.
Saturday, February 12, 2011
My Fantastic Purse!
I made this purse over the last week or so and I love it! I got the pattern from Warehouse Fabrics Inc. There were a few things I'd change on it if I made it again but just minor things. I've never used piping before but I love the way it looks. It has a magnetic button (which was new to me also) that's really strong. But the best part is the fabric. I absolutely LOVE the fabric. It was hanging on my banister for a week and every time I walked by it I had to admire it.


It's nice an roomy, has pockets for my cell phone, iPod and 3 pens! Oh how I love it.


It's nice an roomy, has pockets for my cell phone, iPod and 3 pens! Oh how I love it.
Monday, February 7, 2011
Tortilla Cass
This recipe has been requested by several people so I thought I'd just put it on here and everyone can have it! It is, of course, my mom's recipe and who knows where she got it. But it's a quick casserole that even I (the pickiest kid ever) ate as a child (but I did pick out the green chiles).
Tortilla Casserole
2 Chicken Breasts, cooked and diced (you can season them with taco seasoning if you want)
1 Can Green Chiles (4oz or 7oz depending on what you like. I use the 4oz can)
2 Cans Cream of Chicken (or mushroom or celery)
1 C Sour Cream
1 Can Black Beans
1 Can Olives, sliced
1 Pack Corn Tortillas (10 or 12, doesn't matter) cut into little nickel-sized squares
2 T Taco Seasoning
Fresh Chopped Cilantro (however much you like. I like a lot but I know a couple weirdos who despise cilantro)
Cheddar Cheese to cover the top
Mix all of the ingredients together except for the chicken and tortillas. Once it's nicely stirred, add the chicken and tortillas. Put it in a 9x13 casserole dish and cover with cheese. Bake at 350 for about 30 min or until the cheese turns a golden brown.
That's it! Super easy. Super delish.
Sunday, January 30, 2011
The Scrappy Clutch
So I was asked by my Mother-In-Law to make a case for her newly acquired iPod Touch. I dreamed up this little number. No mistakes, nicely sewn.

It totally fits the iPod and is great for when it's thrown in your purse and you don't want to damage the screen...or lose it in there. But, her iPod came with a silicone case which I tried to account for in my measurements but it was the first time I made this thing so it wasn't big enough. So, I set out to make the Scrappy Clutch from "From an Igloo." I figured it'd fit the ipod (in it's grippy case) and all the cords and plugs that go with it. I thought it was super cute...until I tried to make it. Ok, probably if I made it again I'd make it bigger (at least 2" on either side) and it'd go a lot smoother. But I'm not going to be making it again anytime soon or else I'll gouge my eyes out with the seam ripper. The problem lies in my sewing machine. The free arm part of the machine is bigger and longer than the clutch. So sewing around the opening was challenging. I honestly stopped several times and took deep cleansing breaths. And I did yell (not yell (no voice raised) but made it clear to leave me alone) at my husband. (Sorry, Dr. G Medical Examiner) But I had to finish the darn thing TODAY! Or else I'd have to deal with it tomorrow and I was totally done with it. And here it is.

I don't know why the picture is sideways but I can't fix it. I'm sure it's just because I had such a hard time making it so why shouldn't I have a hard time blogging about it!? It will fit all of the iPod stuff my Mother-In-Law has and it has a nice little strap (the only perfect part about the stupid thing) for comfort. The best part about it is IT'S DONE! I was thankfully pulled out of my bad mood by watching The Proposal. If you've never seen it, watch it. Hilarious. Bound to cheer you up after a bad day of sewing. I made it. I didn't admire it. And now I'm giving it away. Forever......and going to finish my movie.


I don't know why the picture is sideways but I can't fix it. I'm sure it's just because I had such a hard time making it so why shouldn't I have a hard time blogging about it!? It will fit all of the iPod stuff my Mother-In-Law has and it has a nice little strap (the only perfect part about the stupid thing) for comfort. The best part about it is IT'S DONE! I was thankfully pulled out of my bad mood by watching The Proposal. If you've never seen it, watch it. Hilarious. Bound to cheer you up after a bad day of sewing. I made it. I didn't admire it. And now I'm giving it away. Forever......and going to finish my movie.
Wednesday, January 26, 2011
Team In Training
My husband, Craig, is a chiropractor in Monterey, Ca. He's newish to the area and is always looking for new patients! I'm a little biased but I think he's a great chiropractor because he treats more than bones. A big part of his practice is rehab. I do believe that adjusting your bones alone can make you feel a lot better but when you put a little soft tissue work and exercise in there....the results are 100 times better. Well, if you're lookin' for a great chiropractor in the area, check out Gonzales Chiropractic. It's a pretty sweet website, even if you're not from the area. There's health articles, games, general chiro information...a lot. You can even have stuff emailed to you from the site. Check it out. For new patients, there's a coupon for a free exam! Free stuff is always good. Support his business so I can support my crafting obsession.
Anywho, Craig has recently decided to run a marathon. No, he's not what you'd call a "runner." He can run but the other day he said, "I think the most I've ever ran is 4 miles." Sorry, Dude, that ain't gonna cut it. So, he's been running almost everyday, increasing a little at a time. The marathon is in June in San Diego and he's going with a group call Team In Training. If you've never heard of Team In Training (TNT), it's an organization that helps people get ready for marathons, triathlons, bike rides and the like but also gets the participants to raise money for the Leukemia and Lymphoma Society. For more information go here. But Craig needs to raise some moola in order to go on his trip to San Diego. Specifically, he needs to raise $2500. Yes, I know it's a lot, but the money really does go to a good cause! Anything helps! Please visit his site and see what you can do for cancer! THANK YOU!
Anywho, Craig has recently decided to run a marathon. No, he's not what you'd call a "runner." He can run but the other day he said, "I think the most I've ever ran is 4 miles." Sorry, Dude, that ain't gonna cut it. So, he's been running almost everyday, increasing a little at a time. The marathon is in June in San Diego and he's going with a group call Team In Training. If you've never heard of Team In Training (TNT), it's an organization that helps people get ready for marathons, triathlons, bike rides and the like but also gets the participants to raise money for the Leukemia and Lymphoma Society. For more information go here. But Craig needs to raise some moola in order to go on his trip to San Diego. Specifically, he needs to raise $2500. Yes, I know it's a lot, but the money really does go to a good cause! Anything helps! Please visit his site and see what you can do for cancer! THANK YOU!
Tuesday, January 25, 2011
Zucchini Bread
My awesome friend Sarah was looking for a delicious zucchini bread recipe the other day and I told her I had one. It's sooo delicious...especially if you use homegrown zukes. It's moist and delicious and just thinking about it makes me want some. Mom, thanks for a delicious recipe! Sarah, this one's for you!
Zucchini Bread
Zucchini Bread
2 C sugar
1 C oil
3 Eggs
1 T Vanilla
3 C Flour
½ t Baking Powder
1 t Salt
1 t Baking Soda
1 T Cinnamon
2½ C Grated Zucchini
Preheat oven to 350.
--Grease and flour pans well. Preheat oven to 350.
--Cream oil and sugar. Add eggs one at a time. Add vanilla.
--In a separate bowl, mix dry ingredients together.
--Add grated zucchini and dry ingredients alternately to oil/sugar mix.
--Pour into 2 standard loaf pans or 4 mini loaf pans.
--Bake at 350 for 50 min for large pans and 40 min for smaller pans.
--Bread is done when a skewer comes out clean. Don't over cook it or you'll be sorry!
Let bread sit in pans for at least 5 min before moving to a cooling rack.
Reversible Hooter Hider Tutorial
The Hooter Hider (AKA a nursing cover) is a fantastic gift for a new mom. It doesn't take long to make and making one is $20-$30 cheaper than buying one (depending on what kind of fabric you use).

Supplies:
1 Yard**--Fabric A
1 Yard--Fabric B
2--1" D-Ring
16" of 1/4" Boning
Some sort of marking pen/pencil/chalk
**A yard of each of these will give you enough left overs to make a few pacifier clips, burp clothes and other little baby things.
Cut your main pieces:
Fabric A = 1 piece 35" x 24"
Fabric B = 1 piece 35" x 24"
Cut the straps:
Either A or B = 1 piece 3" x 10"
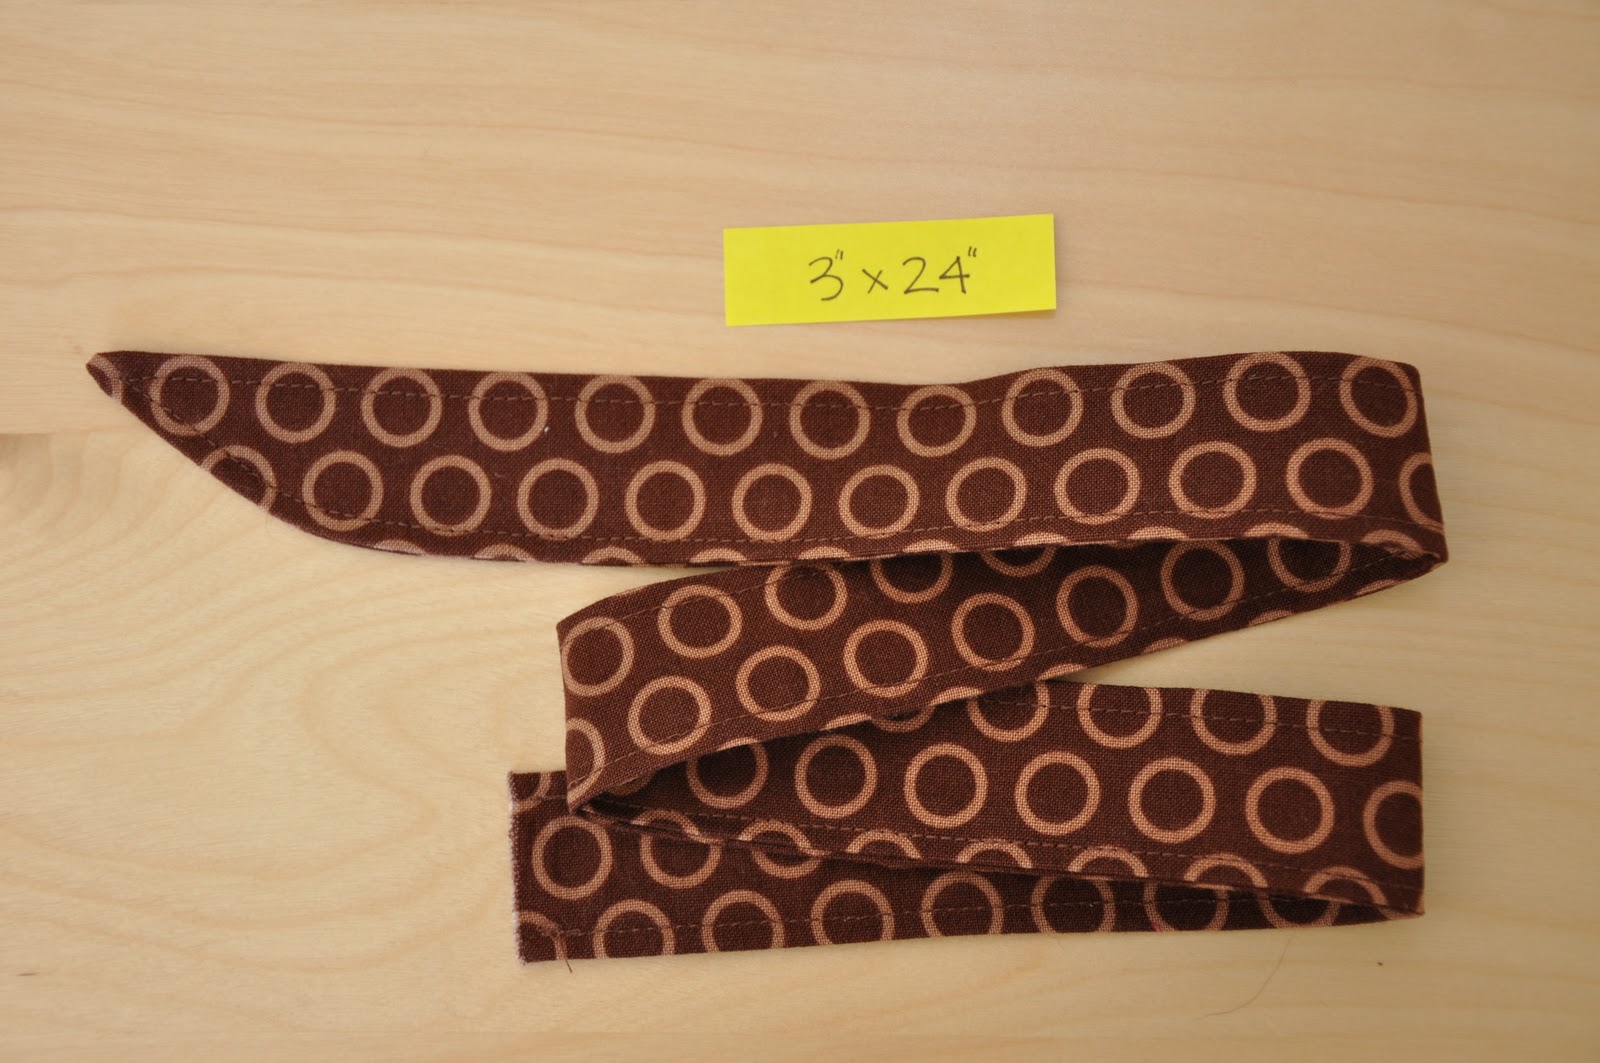
Either A or B = 1 piece 3" x 24"

Set the main pieces aside and work on the straps. Fold them in half, right sides together and iron flat.


Trim the curved end so it's about a 1/4" seam.

Turn the pieces inside out and iron. For the 10" piece, I put the seam in the middle because it will be hidden. The 24" piece will have the seam showing but it's ok. You can go ahead and try putting the seam in the middle...let me know how it goes. (That's sarcasm. Don't do it.)

Then, take your D-rings and put them through the 10" piece, fold it in half and sew a 1/8" seam around the perimeter. This piece is done-zo!

Sew a 1/8" seam around the 24" piece and this piece is also finished! Set the straps aside and grab the main pieces.

Make sure the pieces are ironed and lay them right sides together. Pin on 3 sides, leaving a 35" side open. For the open side, take the boning and place it in the middle (on top of the fabric) and mark the ends. There's probably about 9.25-9.5" on either end of the boning depending on how well you cut the fabric and boning.


OK! Now, sew! It should look like the pic below when you're done. Oh, so you're leaving the one side mostly open. Just sew over the straps and stop. I started sewing on the left side at the strap and went around (left and right according to the pic below) and stopped just after the other strap. Don't forget to backstitch!

Trim the corners (as in the pic above). Turn the project right side out and iron flat. I find that if you spray the fabric with water, it's easier to get the seams to pop out and you get better results.

All finished ironing!


My first model was handsome but he moved a lot was was trying to lick the product.

**Special thanks to my husband who reluctantly posed and wore a breastfeeding cover for me.
Please let me know if something doesn't make sense. Post some pictures of your nursing covers...I'd love to see them!
This nursing cover was adapted from Freshly Picked. I don't take credit for thinking of this...I just make them for friends and this is my way of doing it.

Supplies:
1 Yard**--Fabric A
1 Yard--Fabric B
2--1" D-Ring
16" of 1/4" Boning
Some sort of marking pen/pencil/chalk
**A yard of each of these will give you enough left overs to make a few pacifier clips, burp clothes and other little baby things.
Cut your main pieces:
Fabric A = 1 piece 35" x 24"
Fabric B = 1 piece 35" x 24"
Cut the straps:
Either A or B = 1 piece 3" x 10"
Either A or B = 1 piece 3" x 24"

Set the main pieces aside and work on the straps. Fold them in half, right sides together and iron flat.

Sew a 1/4" seam across the open edge of each. Don't worry about leaving the ends open. They'll be hidden so there's no need to finish them or make them look nice. On the long piece, curve the end. I drew a line on mine as a reminder. Curving the end makes it easier to put it through the d-ring later. Don't forget to backstitch on the ends to prevent your sewing from coming undone!

Trim the curved end so it's about a 1/4" seam.

Turn the pieces inside out and iron. For the 10" piece, I put the seam in the middle because it will be hidden. The 24" piece will have the seam showing but it's ok. You can go ahead and try putting the seam in the middle...let me know how it goes. (That's sarcasm. Don't do it.)

Then, take your D-rings and put them through the 10" piece, fold it in half and sew a 1/8" seam around the perimeter. This piece is done-zo!

Sew a 1/8" seam around the 24" piece and this piece is also finished! Set the straps aside and grab the main pieces.
Make sure the pieces are ironed and lay them right sides together. Pin on 3 sides, leaving a 35" side open. For the open side, take the boning and place it in the middle (on top of the fabric) and mark the ends. There's probably about 9.25-9.5" on either end of the boning depending on how well you cut the fabric and boning.


Take your straps and place them BETWEEN your fabrics with the edge of the strap against your mark. It doesn't really matter which strap goes on which side because this this is reversible. These pictures are actually a trick because the picture on the left shows you the left side of the cover...the mark is towards the center. The picture on the right is actually of the right side but I was just trying to show you the strap inside...you can't see the mark in this picture but it's on the left side of the strap...towards the center .


In this picture you can see mark and the white and blue pins are holding the strap in place.

OK! Now, sew! It should look like the pic below when you're done. Oh, so you're leaving the one side mostly open. Just sew over the straps and stop. I started sewing on the left side at the strap and went around (left and right according to the pic below) and stopped just after the other strap. Don't forget to backstitch!

Trim the corners (as in the pic above). Turn the project right side out and iron flat. I find that if you spray the fabric with water, it's easier to get the seams to pop out and you get better results.

All finished ironing!

Sew a 1/4" seam around the outside of the 3 closed sides.The top will be done later. I like to do it this way so when you're putting the boning in, you don't have to worry about stuff moving...you already know it's finished and in the right spot.

Now for the tricky part. Put your boning on the inside lip of the fabric that's on laying on the table and fold both fabrics in about 1/4". Secure it in place. I used binder clips and hair clips because pins don't work very well. The ends of the boning should be right up against the straps.


Sew a 1/8" seam to secure the boning in place. I usually sew from the outside edge of the straps just for extra security on them (but I forgot). Make sure you're catching the boning when you sew.

Last step! Sew a 1/4" seam on the top. And the rest if you didn't earlier. Guess what...you're done!


My first model was handsome but he moved a lot was was trying to lick the product.

**Special thanks to my husband who reluctantly posed and wore a breastfeeding cover for me.
Please let me know if something doesn't make sense. Post some pictures of your nursing covers...I'd love to see them!
This nursing cover was adapted from Freshly Picked. I don't take credit for thinking of this...I just make them for friends and this is my way of doing it.
Subscribe to:
Posts (Atom)