Tuesday, January 28, 2014

Trail Mix

Soooo, as you may have noticed....it's been awhile since I've written a post. What happened was...I had a baby. He's awesome and no longer a baby. So here's an attempt at putting more stuff on here!

This is a recipe for trail mix. It's so good! Kinda sticky so you have to use a spoon or wash your hands after you eat it. I prefer to put it in some Greek vanilla yogurt.  My mom gave me this recipe so I'm not sure where it came from. I've customized it a bit.

Ingredients:
  • 5 Cups nuts and seeds of your choice (I use 1 C each of slivered almonds, sunflower seeds, chopped walnuts, chopped pecans and pumpkin seeds)
  • 1/3 C coconut oil
  • 1/3 C honey
  • 1 t cinnamon
  • 2 t vanilla
  • 1 C shredded, unsweetened coconut
  • 1 C dried cranberries
Directions:
  1. Put your nuts in a bowl. Set aside.
  2. In a small pot, melt honey and oil.
  3. When it is all melted, turn off the heat.
  4. Add cinnamon and vanilla to honey/oil mix.
  5. Turn the oven on to 300 deg.
  6. Pour the mixture over the nuts and stir well.
  7. Spread on a cookie sheet and bake for 15 min.
  8. Stir the nuts around and bake for another 10ish minutes. Be careful not to burn them!
  9. When it's all done, put it back in your bowl and add the coconut and cranberries.
  10. Spread it back on the baking sheet to cool.
  11. Enjoy!

Thursday, September 22, 2011

Oatmeal Chip Bars

This recipe is from the Penzeys Fall 2011 catalog. I thought I'd give it a try since I've been wanting to make chocolate chip cookie bars for awhile now.  So far, they smell good in the oven. I hope everyone at work enjoys them tonight!

Oatmeal Chip Bars
Ingredients:
1 C room temp butter
1 1/4 C brown sugar
3/4 C white sugar
2 eggs
1 t vanilla
2 C flour
2 t baking powder
1/2 t salt
2 C oats (regular or quick-cooking)
3/4 C chocolate chips
3/4 C butterscotch chips

Directions:
Preheat oven to 375.
In a mixing bowl, cream butter, sugars, eggs and vanilla.
In a separate bowl, combine flour, baking powder and salt.  Gradually add to creamed mixture.
Mix in oats and chips last.
Spread in a 9x13 pyrex or similar dish.  Bake for 25ish minutes.**

**Always set your timer for less time than a recipe says. You can always add more time!

Wednesday, August 17, 2011

Pumpkin Muffins!

I brought these to work the other day and everyone wanted the recipe...so here it is! This recipe makes about 12 muffins so I usually double it. 

Pumpkin Muffins

Ingredients:
Wet:
1/2 C unsalted butter, melted and cooled
3/4 C packed brown sugar (I know it's not really wet, but it goes in this group)
3/4 C canned pumpkin
1/4 C well-shaken buttermilk
2 large eggs
1 t vanilla

Dry:
2 C flour
2 t baking powder
1/4 t baking soda
1 t cinnamon
3/4 t ground ginger
1/8 t ground allspice
1/8 t ground cloves
1/2 t salt

Optional:
1/3 C dried cranberries (I added more as I went until I like the amount that was in the batter)
You could also use raisins and pepitas (pumpkin seeds) if you'd like

Directions:
--Preheat oven to 400 deg.
--Throw all of the dry ingredients together in a bowl.
--Mix wet ingredients together in the mixer.
--Slowly add the dry ingredients to the wet ingredients and then add cranberries.
--Put batter in muffin tins (with or without paper). These muffins do not rise a lot so fill about 2/3 full.
--Bake about 15 min.  The time really depends on your oven so start with a low number and add time as needed.  Muffins are done when you can poke a skewer in a muffin and it comes out clean.
--Cool on a cooling rack.

Wednesday, July 6, 2011

Pacifier Clip Tutorial

Yes, I know, just like all of my other posts, it's been awhile. But before I head to the airport to go home, I thought I'd post something.  So for all of you making stuff for babies, here's tutorial for a pacifier clip or toy clip. I made 2 because they match the hooter hider I made. Also, Happy Birthday to Ryan James, who was born today! And congratulations to Katie, his mom!

Supplies:
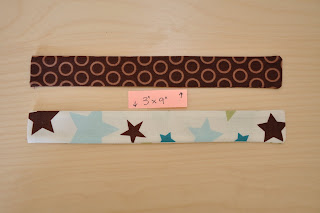
1 Piece of fabric 3" x 9"
1 Mitten clip
7" of 5/8" Ribbon (Grosgrain works best)
Coordinating thread

Instructions:

Cut your fabric.

Turn right sides together and pin.  Fold down one end about 1/4". This makes it look nice after you turn it.

Sew three sides.  Leave the end you folded over open.  Trim the corners. 

Make sure you catch part of the fold so it doesn't come undone when you turn it.

Turn the tubes inside out and iron flat.

Take your ribbon and fold in half.  Sew into the opening.  Sew a tiny seam around the entire thing. I add a small stitch across the top right next to the ribbon just for security purposes (not shown).  The grosgrain ribbon works best for putting through pacifiers with tiny holes (soothies) but if you're using a pacifier with a loop, it doesn't matter what kind of ribbon you use.

Take your mitten clips and sew them on.  Make sure when you fold the end over the bottom of the clips are facing the part you're folding over.  I sew across and then up the 2 sides, following the other seams.

The top side.

Clip it on! You can also put this on toys or whatever so it doesn't fall on the ground.  You could also put a clip on each end so you can attach blankets and stuff to the stroller/carseat/kid...whatever you like!

 If you put clips on both ends you can attach a blanket or burp cloth to the carseat or a shirt.  This was very useful when I was walking through the airport w/ a burp cloth on my shoulder.  It inevitably slipped off my shoulder but didn't fall on the floor b/c of my double clip!

Tuesday, April 12, 2011

Streusel Coffee Cake

I made this delicious coffee cake today. I've been thinking about making if for a couple weeks and today happened to be the day.  I had my doubts when I was making the batter because it was sooo thick and there wasn't very much...but it is fab.  And puffs up like a gem.  The recipe is from A Bountiful Kitchen.  The recipe can be found here but I'm putting it on here because I actually remembered to take pictures and darn it, I'm going to use them!

Streusel Coffee Cake
1 1/2 cups flour
3/4 cup sugar
2 t baking powder
1/4 t salt
1 egg, beaten
1/2 cup milk
1/4 cup oil (vegetable)

Streusel topping:
4 T brown sugar
2 T flour
1 t cinnamon
4 T butter
1 cup chopped nuts (optional)
if not using nuts, add 1/2 cup flour (*I used a total of 4 T of flour for the topping and no nuts.  1/2 C just seemed like so much)

Preheat oven to 350 degrees.
Mix the first 4 cake ingredients in a bowl. Make a well in the center, and add the wet ingredients. Mix just until all ingredients are incorporated. 
 Pour into a greased 8 or 9 inch cake pan (round or square).
Place brown sugar, flour and cinnamon for streusel into a small bowl. Cut butter into dry ingredients. Add chopped nuts, or more flour if omitting nuts. Crumble topping over batter . 
 Bake at 350 for about 30-40 minutes, or until toothpick inserted in center comes out clean. Serve warm. 
Fresh out of the oven.
After cooling for a bit.
The final product. YUM!
Next time I make this, I would swirl some of the streusel into the batter and then cover the top.  The cake is really good but I think having some cinnamon in the middle would be nice.

Tuesday, March 22, 2011

Caesar Dressing

This is my absolute favorite recipe for Caesar dressing.  It's also my only recipe for Caesar dressing but that doesn't matter.  It comes from Cooks Illustrated magazine which is a fantastic place not only for recipes, but also an explanation for why they do the things they do, the best way to store things and sometimes product reviews.  This particular recipe came from the light and healthy edition.  This is my version...no anchovies for me! It also recommends using a blender to mix it all together. I use a fork. Works great, less mess.

Caesar Dressing
1/2 C low-fat buttermilk
3 T light mayonnaise
2 T fresh lemon juice
2 T water
1.5 t yellow mustard
1/2 t Dijon mustard
1 t Worcestershire sauce
1 garlic clove, squished in a garlic squisher
1/2 t pepper
1/4 t salt
2 T EVOO
1 oz freshly grated Parmesan cheese (about 1/2 cup)

Mix everything except the Parmesan cheese together in a bowl.  Grate the Parmesan cheese with a microplane grater and weigh with your kitchen scale (yes, of course I have one).  Mix it all up and eat it because it's sooo good!

For those of you who don't know what a microplane grater is...

there ya go. It's a grater with little tiny blades and it will severely damage the tips of your fingers. So be careful! It's also good for zesting, grinding up ginger, saying you have a microplane grater, etc....I do actually use mine all the time.

Also, if you don't have a garlic squisher (AKA a garlic press), get one of those too.  I mean really, who wants to mince garlic?! NO ONE!  Here's a little garlic tip...the best way to peel garlic = silicone pot holder.  Yes, you could buy one of these...
but it's really only good for one thing.  Instead get one of these...
They're good for peeling garlic, keeping your hands from being burned, holding your cutting board in place, getting a lid off of a jar...so many uses! They have really cute ones at Sur La Table that come in the shapes of animals. And at Christmas they have gingerbread men, snowmen, penguins...things like that. Way more fun/useful than a silicone tube.


**The microplane grater picture came from a blog which I stumbled upon called A Bountiful Kitchen. It appears to have all kinds of recipes and is very well organized. Worth takin' a look at!

Tuesday, March 15, 2011

1/2 Apron Tutorial

I made this apron for a bridal shower over the weekend and it turned out pretty cute.  I love the fabric and wish I would have bought more. It's Amy Butler who pretty much always has awesome fabric.  I adjusted the tutorial from Stop Staring and Start Sewing.  My lovely model was rushing to go to the shower but took 4 seconds to take a pic for me! Thanks Cakes!

Supplies:
1 Fat Quarter of Fabric
1/2 yard of coordinating fabric

From your fat quarter cute a little bit off to make it 16" x 20" (you can use your whole fat quarter. I adjusted mine for the little person I was making this for).  Also cut 2 pieces of coordinating fabric 5" x 21" and 1 piece 5" x 22" (*).  Again, you can adjust the 5" if you want a larger tie and increase the length if you want it longer.

Sew the band together, end to end, right sides together so you make a really long strip.  Make sure you put the 5" x 22" piece in the middle. Press seams open.

Fold and press 3 sides in, leaving one long side undone.  I folded twice to create a nice edge. Sew in place.

  
With right sides together, sew the 2 pieces together and press the seam towards the band. I found out later that you should press towards the band, so the picture it wrong but I wanted to show the backside.

Next, fold down the top 1/4" but only the part that is above the main piece.  The straps do not need to be folded. Iron in place.

With right sides together, fold the straps on top of each other to and sew to create a tube. (check out the pic below for how to do the ends) DO NOT sew the part that you just folded down.  See in the picture? The part above the main fabric is open. Don't sew it!

When you get to the end, sew it diagonally. Then trim the excess.

Turn the tubes right side in. Fold down the top of the band and pin in place.  Top stitch around the entire band and you're done!


*My numbers for this are slightly off because I was in a hurry and didn't trim the selvage off. So, adjust accordingly.  The trouble comes when the sides of the main fabric piece are turned in to create an edge. It depends on how big you make your seam allowance. But if you're not in a hurry, think about it a little and it'll be right. I think i also would have made the straps a little longer for tying in front. It's probably fine if you're tying in back but I didn't try it.